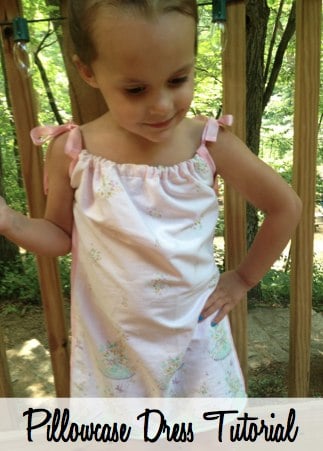
How to Make a Pillowcase Dress

If you have any little girls in your home, you probably know how much they love romping around in dresses. Whether they are actually needing to be dressed up for an event or just playing tea party, the perfect dress can really make any activity feel special.
A romper dress at your local children’s clothing store can cost you as much as $40, which may not exactly be in your budget, especially if you have a child who once she puts her dress on won’t want to take it off. So what do you do? Well, a pillowcase dress is the perfect solution for a parent looking for a frugal yet durable dress alternative.
Pillowcase dresses are so easy to whip up, and use materials you may have around the house already. You don’t need to be a master seamstress in order to make one, in fact minimal sewing skills are really all you need. Take a look below at how you can make your own children’s pillowcase dress that will really get you rave reviews!
First, let’s take a look at the supplies you will need. Most of these items can be found at your local craft or fabric store.
Pillowcase Dress Supplies
- Sewing Needle
- Sewing Thread
- Sewing Machine
- Scissors
- Wide Elastic
- Bias Binding
- Safety Pins
- Coordinating Ribbon
- Tape Measure
- 1 Standard Size Pillowcase
Look for fun patterns at your local thrift store for just pennies.
Pillowcase Dress Tutorial
- Start with one pillowcase that you have cleaned and ironed.
- Measure your child from their shoulder to knee.
- Now, measure this same distance on your pillowcase from the open end, and cut straight across.
- On each side of the pillowcase at the cut edge, draw arm holes. This will be shaped like a letter “J” with the top of the J at the cut edge of your pillowcase. It will be about 3 inches deep. Don’t be afraid to freehand this.
- Fold the two top edges ¼ inches to the inside. Fold down and press these edges again, this time ¾ inches.
- Stitch along the first fold from one end to the other. This will start forming a tunnel.
- Cut your elastic into two 6 inch pieces. Put a safety pin to one end of one piece and use that to thread the elastic through one of the tunnels. This will form the neckline.
- Stitch across the open end of each tunnel to hold your elastic in place. Repeat with the other elastic and tunnel.
- Cut two pieces of bias binding, each 28 inches long.
- Slip one arm hole edge into the fold of one of the binding pieces, leaving 9 inches overhanging the top. These will form the ties to secure the dress on.
- At one end of the binding, start stitching along the free edge, moving all the way around the arm hole and to the other end of the binding. Repeat for the second arm hole.
- Thread your ribbon into each of the arm holes, tying at the top.
- Sew several securing stitches at the side seam to keep the ribbon from being pulled out.
That’s it! Remember just to take these instructions step by step and go slow. What you basically want to do is just make sure you have two clean arm holes made, and use your mad stitching skills to create tunnels to run your ribbon through. Keep those two goals in mind and the rest of these steps will fall into place.
Your child can wear the pillowcase dress alone or with a pair of stretchy leggings on cooler days. These dresses are so durable and a great way to makeover an old pillowcase you are no longer using. Give this pillowcase dress project a try and see what you can create!
PrintHow to Make a Pillowcase Dress

Learn how to make a pillowcase dress. Simple tutorial to help even the non-crafty person make a cute and inexpensive dress!
Ingredients
- Sewing Needle
- Sewing Thread
- Sewing Machine
- Scissors
- Wide Elastic
- Bias Binding
- Safety Pins
- Coordinating Ribbon
- Tape Measure
- 1 Standard Size Pillowcase
Instructions
- Start with one pillowcase that you have cleaned and ironed.
- Measure your child from their shoulder to knee.
- Now, measure this same distance on your pillowcase from the open end, and cut straight across.
- On each side of the pillowcase at the cut edge, draw arm holes. This will be shaped like a letter “J” with the top of the J at the cut edge of your pillowcase. It will be about 3 inches deep. Don’t be afraid to freehand this.
- Fold the two top edges ¼ inches to the inside. Fold down and press these edges again, this time ¾ inches.
- Stitch along the first fold from one end to the other. This will start forming a tunnel.
- Cut your elastic into two 6 inch pieces. Put a safety pin to one end of one piece and use that to thread the elastic through one of the tunnels. This will form the neckline.
- Stitch across the open end of each tunnel to hold your elastic in place. Repeat with the other elastic and tunnel.
- Cut two pieces of bias binding, each 28 inches long.
- Slip one arm hole edge into the fold of one of the binding pieces, leaving 9 inches overhanging the top. These will form the ties to secure the dress on.
- At one end of the binding, start stitching along the free edge, moving all the way around the arm hole and to the other end of the binding. Repeat for the second arm hole.
- Thread your ribbon into each of the arm holes, tying at the top.
- Sew several securing stitches at the side seam to keep the ribbon from being pulled out.