Make Placemats with Gift Bags in 3 Easy Steps!

The following is another great guest post from Aunt Mary…
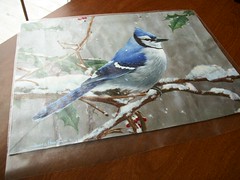
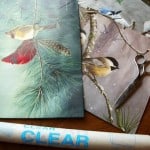
When I go shopping, I'm always looking for a deal or looking for ways to re-create something. After Christmas, I found some gift bags at the Dollar Tree that I could not take my eyes off of (they were only 50 cents each). Although I am not an avid Bird watcher, I fell in love with the beauty of these bags. Here is where my mind took me (which is usually not far :).
If you want a rustic decoration for your table that will last well into winter after the holidays, try this. You can also find bags with other decorations for the seasons, like Easter, Valentines Day, Halloween. Any gift bag that appeals to you, can be used in this project.
Gift Bag Placemat Necessary Materials
:: 2-4 Gift Bags
:: Clear Plastic Adhesive Wrap
:: Sissors
If you are using 2 bags, you will need to use the front and back. The steps will explain what to do. Also, the bags in this project are 13″ X 18″. Keep the size in mind depending on what your place setting will be.
Finally, I purchased a clear plastic adhesive that was 20″ x 9′. You can find this at any craft store for around $3.
DIY Steps
{Step 1} Cut out one side of the bag that you want to use. If using both sides, cut away from both end pieces and the bottom.
{Step 2} Lay the picture on a flat surface and take the plastic and unroll with the tacky side down covering the picture. As you unroll the plastic, with you other hand spread the tacky plastic down as you go to form a seamless sheet of plastic over your bag.
{Step 3} Do the same for the back side of your picture.C ut away any excess plastic as close to the picture as possible. Doing this forms a barrier for easy clean up. All you need to do is wipe off after a meal.
I chose a variety of the bird bags for my placemats, because I loved them all, but you can use only one design and only have to buy two bags.
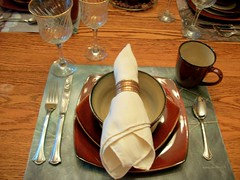
When you place them on your table, they look beautiful. I am using my new dishes I received from my sister for Christmas. Very rustic.
The total cost for this project was around $5. But, it would be even less if you already have gift bags to use!
Make Placemats with Gift Bags in 3 Easy Steps!
Ingredients
- 2–4 Gift Bags
- Clear Plastic Adhesive Wrap
- Sissors
Instructions
- Cut out one side of the bag that you want to use. If using both sides, cut away from both end pieces and the bottom.
- Lay the picture on a flat surface and take the plastic and unroll with the tacky side down covering the picture. As you unroll the plastic, with you other hand spread the tacky plastic down as you go to form a seamless sheet of plastic over your bag.
- Do the same for the back side of your picture.C ut away any excess plastic as close to the picture as possible. Doing this forms a barrier for easy clean up. All you need to do is wipe off after a meal.