Make an Organizational Shelf with Baby Food Jars
I know a lot of you have already thought of ways to use Baby Food jars. Using them for nuts and bolts in the garage, I know men that do this.
I went a step further and thought about how I could use these to organize in my home office and even in the kitchen (for things like spices).
Organizational Shelf Materials Needed
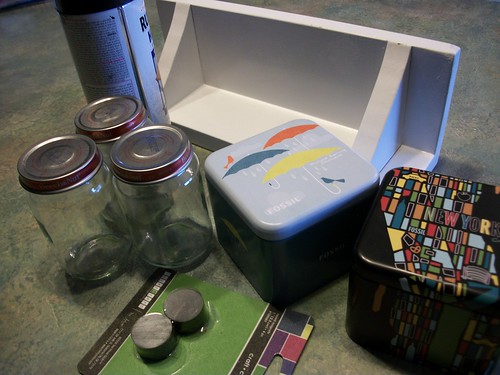
- Shelf, any size (found at Goodwill)
- Spray Paint
- Tin Containers (mine tins that Fossil watches come in)
- Magnets, heavy duty
- 3 Baby Food Jars
- Wood Screws (enough for your jar lids and tins)
Make sure that these screws are short enough that they will not go all the way through you shelf.
Direction for Assembly
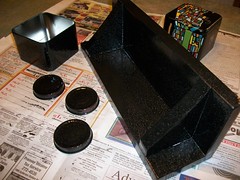
{Step 1} Paint your shelf, lids from the baby jars and any tins. Make sure to do this in a well vented area. Let dry.
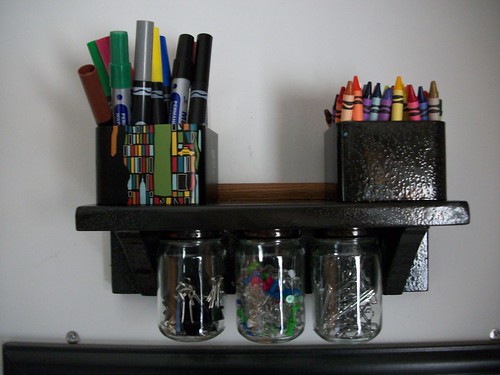
{Step 2} When dry, place one (1) tin on top of the shelf and screw a wood screw on the inside bottom of the tin attaching it to the top of your shelf. Do any other tins you have the same way.
{Step 3} Place your top of a baby food jar lid on the underside of the shelf and screw the wood screw into the shelf (making sure that the screw does not go all the way through the wood) Do the rest of your lids this way, spacing them apart a little as you go for easy access.
{Step 4} Attach the shelf to the wall making sure that you position it for easy access.
{Step 5} Fill your jars with things like paper clips, push pins, thumb tacks, etc and twist onto the lids. Fill your tins with pencils, pens, markers, etc.
You could also use magnets to place them inside your tins. Put them on your magnetic board instead!
Project Cost: $8 total
I found most of the materials at the Goodwill store so I was able to save a lot more for something I'll use all the time!
How could you use this in your home?
This post was submitted to the following weekly site memes:
The Frugal Girls Chic & Crafty Party
Make an Organizational Shelf with Baby Food Jars
Make an Organizational Shelf using Baby Food Jars
Ingredients
- Shelf, any size (found at Goodwill)
- Spray Paint
- Tin Containers (mine tins that Fossil watches come in)
- Magnets, heavy duty
- 3 Baby Food Jars
- Wood Screws (enough for your jar lids and tins)
Make sure that these screws are short enough that they will not go all the way through you shelf.
Instructions
- Paint your shelf, lids from the baby jars and any tins. Make sure to do this in a well vented area. Let dry.
- When dry, place one (1) tin on top of the shelf and screw a wood screw on the inside bottom of the tin attaching it to the top of your shelf. Do any other tins you have the same way.
- Place your top of a baby food jar lid on the underside of the shelf and screw the wood screw into the shelf (making sure that the screw does not go all the way through the wood) Do the rest of your lids this way, spacing them apart a little as you go for easy access.
- Attach the shelf to the wall making sure that you position it for easy access.
- Fill your jars with things like paper clips, push pins, thumb tacks, etc and twist onto the lids. Fill your tins with pencils, pens, markers, etc.

my grandpa did this with the baby food jars in his wood shop all the time. we have one idea to improve step #3… use two screws instead of one. he always had a problem with the lids spinning if he used one screw, so he started using two that were not centered (kind of like where the holes would be on a botton) and then they don’t spin.
Look at you getting all Martha Stewart on us! LOVE IT!! What an easy way to store all the STUFF that usually flies all over a junk drawer or all over my desk.
Lynn, LOL, it’s not me, it’s my aunt (Mary) who has been helping with these crafty posts! But, I’m inspired to try it!
Awesome idea.. I am going to try this. I thought that I could use the cans that you buy formula, or gerber graduate snacks come in and the baby food jars. What a way to go green!!
Love this idea!
I’m thinking of using this idea in two different ways:
1.) A longer shelf and use it in a sewing area for all those odds and ends and smaller pieces.
2.) Find a similar shelf to the one you used, but paint it in a “girly” way and use it to keep all of the hair bows, clips, ponytail holders, etc. that my little girls have organized!
Great post!
Thanks for stopping by, Danielle!! You’ll have to share a picture when you make yours!
Great post! I have saved lots of pasta sauce jars. I always have that idea in my head. It’s time to make it a reality.
Becky, you’ll have to let us know how it goes with pasta sauce jars. I’ve been saving mine to use for dry goods for now.
One other step might be to put the tins on with something where they can be taken down off the shelf to use the entire tin at a table while working on a project and then slid back in place on the shelf something that still connects them to the shelf while they are up there but also has a release some how.
Jenna, that’s a great idea. Thanks for stopping by!
Maybe hot glue magnets on top and the tins will stick to them. Then you can take them down while not in use. Im about to move in a camper while my husband travels and homeschool my children. This will be a great organizational tool in a smaller space.
Natasha, that is a great idea too! There is limited space in a camper so you could definitely be resourceful with your space while having something cute to use! LOVE it!!