Framed Bathroom Mirror DIY
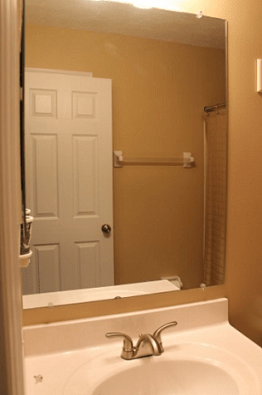
Here is a pretty inexpensive way to spice up a bathroom by simply adding a frame to a plain mirror. I just couldn't handle ours one more day so we headed to the local hardware store to purchase 2 pieces of trim and some caulk.
Framed Bathroom Mirror Supplies
:: Saw (Miter board and Saw work great together for the angles)
:: Measuring tape
:: 2 Trim pieces, 16ft
:: Caulk
:: *Paint/stain* optional if chosing a natural trim to stain
:: Mirror adhesive/Glue (Liquid nails is our choice)
:: Level
Framed Bathroom Mirror DIY Steps
{Step 1} Measure each side of the mirror.
{Step 2} Measure twice and cut once for each side at a 45 degree angle so that it fits together as snug as possible.
{Step 3} *OPTIONAL* Paint/Stain the boards and let them dry completely.
{Step 4} Make sure the trim is level to the mirror and then glue each side of the trim to the mirror.
{Step 5} Once the glue has dried. Begin to caulk each seam to fill in the gaps. Clear caulk can be easily painted over, however, we used white caulk to blend ours.
Project Cost
Trim pieces can range in price depending on the design, width and finish. We chose a pretty cheap trim to compliment our minimalist modern tastes however you can expect them to range from $5 – $35 for a 16′ section.
We were able to find the caulk for about $3.50 and did not need to purchase paint since we liked the white finish. The mirror adhesive costs around $3.50 as well.
If you do not have a miter saw, you can use the box and they can cost around $10 – $15 at your local hardware store.
If it is a new home you are remodeling, be sure to use your 15% hardware discount in the change of address packet found at the post office!
Framed Bathroom Mirror DIY
Framed Bathroom Mirror DIY
Ingredients
- Saw (Miter board and Saw work great together for the angles)
- Measuring tape
- 2 Trim pieces, 16ft
- Caulk
- *Paint/stain* optional if chosing a natural trim to stain
- Mirror adhesive/Glue (Liquid nails is our choice)
- Level
Instructions
- Measure each side of the mirror.
- Measure twice and cut once for each side at a 45 degree angle so that it fits together as snug as possible.
- *OPTIONAL* Paint/Stain the boards and let them dry completely.
- Make sure the trim is level to the mirror and then glue each side of the trim to the mirror.
- Once the glue has dried. Begin to caulk each seam to fill in the gaps. Clear caulk can be easily painted over, however, we used white caulk to blend ours.

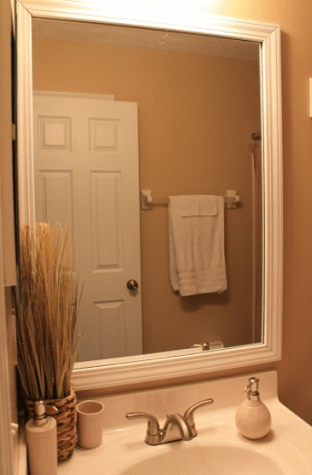

We have done this to one of our bathroom mirrors as well! We used more of a flat decorative white trim piece (rather than the bevelled as show above) and then, so you don’t have to do the angled cuts, we bought the decorative trim squares that they sell in the same area to place in the corners! So it only takes straight cuts! It changes the whole look of the bathroom!
Awesome! Thanks for the great tip that you used as well. I love both options.
How did you get around the plastic pieces that hold the mirror up? I want to do this in my little bathroom, but when my dad and I were at the hardware store, we determined the extra wood needed to raise it up to basically make it thicker and nail to wall (rather than glue to mirror) would cost about the same as buying a new mirror at Home Goods. Anyway, if you could let me know that would be great! :)
Joanna,
I am not sure how they did it above, but when we did it, we used Liquid Nails and just glued the mirror directly to the wall. I am sure it will not be fun to remove if we every chose to. I suppose, if you had the right tools, you could somehow cut out a well in the back of the molding so that it fit directly over the little brackets?
Melanie