Dry Erase Calender DIY
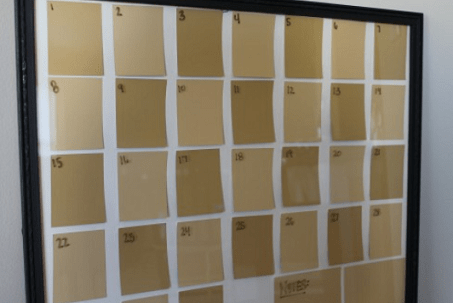
I can never have too many calenders in my crazy world. I was getting so BORED with my standard store bought white dry erase board that has forever held my meal plans each month. It was so plain and did not match the rest of the kitchen and so to Pinterest I went. Voila….the idea hit me!!
A standard old frame that you could write on and could become more of a piece of art than the generic ones!
Dry Erase Calender Suplies
:: Picture Frame (I used a 20 x 15)
:: Spray Paint
:: Glue Stick
:: Tape Measure
:: Scissors
:: Paint Samples
:: Dry Erase Marker
DIY Steps
{Step 1} Gather all the supplies and carefully protect the glass from the overspray of the spray paint. Use light sprays on the frame and letting each coat dry. I did about 4 coats of black until the nasty gold was gone.
{Step 2} While the frame is drying, start assembling your base frame. My frame came with a nice white background, however, you may have use cardstock to cover your background if desired.
{Step 3} Next, use your paint samples and make each square 2 x 2. I was able to cut mine in half. Using a bit of Jr. High math, I was able to put 31 spaces down with 2 extra bigger ones for a “notes section”.
{Step 4} Next, I carefully glued down each sample evenly with the help of the tape measure (and the hubby).
{Step 4} Then, I eased the paint sample background into the frame with an extra helping hand to make nothing slid out of place. After it was secured, I was able to take my dry erase marker and went to town numbering the days.
Project Cost
A GOLD yucky picture frame from Goodwill for a whole $5! Free paint samples that you can pick up at your local home supply. I had the spray paint on hand, but a short can is about $2.50. You can use your 40% off one item at Michael's for this. The can will last FOREVER for little jobs like this one.
This cute calendar will cost you less than $7.50 and can be used anywhere in your house. You could even use these for chore charts, homework, or even a college dorm room. The possibilities are endless.
PrintDry Erase Calender DIY
Dry Erase Calender DIY
Ingredients
- Picture Frame (I used a 20 x 15)
- Spray Paint
- Glue Stick
- Tape Measure
- Scissors
- Paint Samples
- Dry Erase Marker
Instructions
- Gather all the supplies and carefully protect the glass from the overspray of the spray paint. Use light sprays on the frame and letting each coat dry. I did about 4 coats of black until the nasty gold was gone.
- While the frame is drying, start assembling your base frame. My frame came with a nice white background, however, you may have use cardstock to cover your background if desired.
- Next, use your paint samples and make each square 2 x 2. I was able to cut mine in half. Using a bit of Jr. High math, I was able to put 31 spaces down with 2 extra bigger ones for a “notes section”.
- Next, I carefully glued down each sample evenly with the help of the tape measure (and the hubby).
- Then, I eased the paint sample background into the frame with an extra helping hand to make nothing slid out of place. After it was secured, I was able to take my dry erase marker and went to town numbering the days.


Cute project but I think it is unethical to take paint samples from the store with the intention to use them in a craft project. I have seen others do this too in other types of crafts. If people misuse the sample cards, we will soon have to pay for them. Manufacturers cant supply everyones craft closet for free.
I agree with Carrie. I have lots of paper from my scrapbooking supplies and would probably use them instead. With paper, you could use lighter shades with a pattern on them. I totally understand Melissa!
If you aren’t comfortable using paint sample cards, you could use scrapbook paper. Many of us have this onhand or you can find it on sale at Michaels or sometimes in the $1 bins at Target, so it would add little to the cost of this project. I love the idea to make a big dry erase calendar–I can never fit everything on the small one that I have! Thanks for the great project idea!