Make Your Own Sidewalk Chalk

So, this week I have a craft that you will surely get use out of, Sidewalk Chalk! We always use this on our cul de sac – we have many artists!! So, here's what you need to make Sidewalk Chalk:
- 1 cup Plaster of Paris ($5 for a big container)
- 1 cup water
- Powdered tempera paint ($5 for a large container too)
- Mold for chalk (small paper cups, ice cube trays, tissue rolls, plastic easter egg). We actually used flavor ice plastic popsicle packets that my kids ate 5 minutes before! I rinsed them out and they worked just fine!
- Mixing bowl or ziploc baggie and spoon or paint stirrer.
And, here's what you'll need to do with all of these materials:
- Mix the water and Plaster of Paris together in a large bowl or ziploc baggie. I actually used the ziploc baggie and it worked great to pour into the molds.
- Add the powdered tempera paint to the mixture.
- Once the paint has been mixed in well, set it aside for a few minutes. FYI – it will still be runny but that's how it's supposed to be.
- Pour the mixture (yeap, it's runny while you're doing this part) into the mold and let it dry. The drying time will vary depending on how large your mold is (the larger it is, the longer it will take). With the ziploc baggie, I just cut a little section at the corner, like is done when a baggie full of icing is used to ice a cake. It was a little messy but was a lot easier to squirt into our popsicle packets.
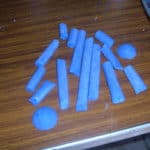
- Once the mold is dry (around 2-4 hours), remove the chalk. If the chalk is still moist, let it air dry for another day. I used an exacto knife and cut the edge of the popsicle packet – it popped right out!
Now your kids (and you) can have a blast creating works of art with the chalk they created. And, since it's just chalk, they can draw so many wonderful creations day after day and the rain will just wash it away :-)
Don't forget, this 50% Off Michael's coupon is valid through tomorrow so get there fast to purchase your tempura paint or Plaster of Paris! I actually purchased all of mine on Wednesday and was able to use it, so I paid $5 for the Plaster of Paris and Powdered Tempura Paint (be sure to get the “powdered” kind..I almost got the regular (which I'm not sure you can use) – see, I'm soooo not crafty :-)
And, please send in those pictures! I know how crazy time is, trust me, I've been behind on a few of these already! But, I would really love to see your pictures!!
And the stuff actually works too – genius!! :-) Here's a pic of my Mommy Snacks marketing in my driveway, like my neighbors don't hear about it enough! Actually, the kids were like, “put dot come behind it.” I had no idea they knew what dot come meant!

Isaiah 64:8: Yet, O LORD, you are our Father. We are the clay, you are the potter; we are all the work of your hand.
Make Your Own Sidewalk Chalk
Ingredients
- 1 cup Plaster of Paris ($5 for a big container)
- 1 cup water
- Powdered tempera paint ($5 for a large container too)
- Mold for chalk (small paper cups, ice cube trays, tissue rolls, plastic easter egg). We actually used flavor ice plastic popsicle packets that my kids ate 5 minutes before! I rinsed them out and they worked just fine!
- Mixing bowl or ziploc baggie and spoon or paint stirrer.
Instructions
- Mix the water and Plaster of Paris together in a large bowl or ziploc baggie. I actually used the ziploc baggie and it worked great to pour into the molds.
- Add the powdered tempera paint to the mixture.
- Once the paint has been mixed in well, set it aside for a few minutes. FYI – it will still be runny but that's how it's supposed to be.
- Pour the mixture (yeap, it's runny while you're doing this part) into the mold and let it dry. The drying time will vary depending on how large your mold is (the larger it is, the longer it will take). With the ziploc baggie, I just cut a little section at the corner, like is done when a baggie full of icing is used to ice a cake. It was a little messy but was a lot easier to squirt into our popsicle packets.
- Once the mold is dry (around 2-4 hours), remove the chalk. If the chalk is still moist, let it air dry for another day. I used an exacto knife and cut the edge of the popsicle packet – it popped right out!

Super cool! Thanks for sharing. I plan to make some homemade bubbles soon. I’m going to bookmark your page. Looks like a lot of helpful information!!
I love the verse you included.
Ok, I seriously had no idea you could make this stuff. I have been buying it for years! Thanks so much for the great tutorial!
Kama – thanks! I’ll let ya in on a little secret: one of the bloggy hostesses has a great bubble formula she’s sharing this coming Friday so stay tuned :-)
Alyssa – I was quite surprised myself! I’ve been quite surprised in general that I can be a craftin’ momma afterall!!