Copycat Pottery Barn Kids Rose Lamp Shade DIY

Oh do I L-O-V-E me some Pottery Barn style, however the husband does not prefer the price. I strive to recreate copy cat versions of little Pottery Barn gems from their sales catalog. I saw this lamp a few months back and just had to make my own little one for the twins' room. Let's just say I spent no where near the $99 that I would have paid at the store.
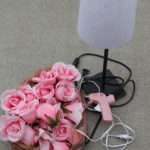
Copy Cat Pottery Barn Rose Lamp Shade Supplies
:: Glue Gun
:: Lamp
:: Artificial Roses (I used about 3 doz but it will depend on the size of the shade)
:: Wire Cutter
DIY Steps
{Step 1} Cut the stems off of the roses.
{Step 2} Start at the top and secure each rose using a generous amount of hot glue as you work around the lamp shade.
{Step 3} Be sure to apply pressure and let each one dry sufficiently before adding each flower. This will help to keep them secure since gravity will be working against you.

Project Cost
I found the lamp at Ikea for $9.00. You can also check your local thrift stores or even garage sales.
I was able to purchase the flowers out of season last winter for around $2.50 a dozen at my local craft store. Also, look for coupons and sales to save if you do not find them on clearance. You will need to purchase at least 36 flowers or 3 dozen for this project.
Basically, I was able to recreate the Pottery Barn version for only $16.50, which is a fraction of the $99 price for just the shade on their website. This is a pretty easy project that you can do in just a few short hours one afternoon.
PrintCopycat Pottery Barn Kids Rose Lamp Shade DIY
Copycat Pottery Barn Kids Rose Lamp Shade DIY
Ingredients
- Glue Gun
- Lamp
- Artificial Roses (I used about 3 doz but it will depend on the size of the shade)
- Wire Cutter
Instructions
- Cut the stems off of the roses.
- Start at the top and secure each rose using a generous amount of hot glue as you work around the lamp shade.
- Be sure to apply pressure and let each one dry sufficiently before adding each flower. This will help to keep them secure since gravity will be working against you.