Homemade Knight in Shining Armor Costume
Learn how to create a Knight in Shining Armour costume.
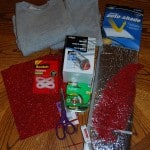
Ingredients
Scale
- Aluminum Dryer Vent Duct – $9.99
- (2) Car Windshield Silver Sun Shades – $3.50 each
- Grey Sweatshirt and Pants – $5 (already had the pants)
- (1) Foamie Glitter Sheet (with a sticky backing) – $1.29
- Feather Plume – $2.99
- (2) Brass Fasteners (already had)
- 6-inch Strip, Velcro (already had)
- Scissors
- Needle and Thread
- Ruler or Straight Edge
Instructions
- Fold the sun shade in half long ways and cut a head hole in the middle of the crease.
- Cut along the sides to make “short sleeves.”
- Attach the Velcro to the front and back of the “armor” to close on either side of the waist.
Cut Aluminum Dryer Vent Duct long enough to cover each arm and leg. Depending on the size duct you buy and the child’s leg it may only cover to just above the knee. - Sew the Vent Duct to each of the sweatshirts shoulders with the sleeves inside the duct.
- Sew the Vent Duct to the sweatpants with the leg of the pants inside the duct.
- Use the 2nd Sun Shade, (2) fasteners and watch this video to make a helmet. (This is my favorite part of the costume!) I had no idea how I was going to make the helmet. Google and the video took care of that question pretty quickly.
- Find a template for a Fleur de Lis or emblem of your choice to decorate the helmet and chest. Cut from the Foamie Glitter Sheet and stick in place.
- Add a feather to the helmet.
- Add a sword and shield to complete the costume. Since I live in a house full of boys, both of these were already in our toy collection!